How to Use a Clamp Meter Measure Current Safely Without Breaking the Circuit
June 22nd , 2026 | AstroAI *
How-To Guide • Clamp Meters • Electrical Testing
How to Use a Clamp Meter: Measure Current Safely Without Breaking the Circuit
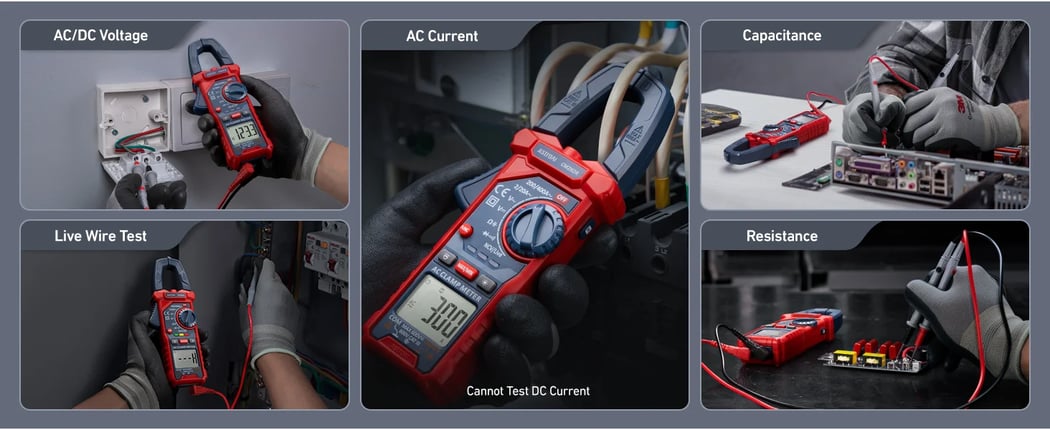
A clamp meter is a practical way to measure current because the jaw reads current around a conductor without cutting the wire or placing the meter in series with the load. The key is knowing what the clamp can and cannot do: use the jaw for current, use the leads for voltage or resistance, clamp around one conductor only, and treat live electrical work as a qualified-person task.
Quick Answer: How Do You Use a Clamp Meter?
Select the correct function, clamp around one insulated conductor, keep the jaw closed, and read the display. Use AC current mode for household appliance loads, DC current mode only on models that support DC current, and test leads for voltage, resistance, continuity, or capacitance. Do not clamp around an entire power cord unless the conductors are separated, because live and neutral current can cancel each other out.
- Beginner use: measure current on one accessible insulated conductor.
- Best AstroAI all-around clamp choice: CM4K0R for 4000-count readings, True RMS, NCV, capacitance, frequency, and AC/DC current up to 400A.
- Heavy-duty use: CM600 for AC/DC current up to 1000A, inrush current, temperature, and higher range diagnostics.
AstroAI Clamp Meter Recommendations
Choose the clamp meter by current type, range, and work scenario.
Best starting point
AstroAI CM4K0R - 400A AC/DC Clamp Meter
Best for DIY users, appliance checks, automotive circuits, and technicians who want AC/DC current capability without jumping to a 1000A tool.
- 4000-count display
- True RMS
- AC/DC current up to 400A
- NCV, capacitance, frequency, continuity, diode, backlight, flashlight, Max/Min, and Data Hold
- Not best for: users who need 1000A current or inrush current capture.
- Pros: balanced feature set for everyday AC/DC diagnostics.
- Cons: not the right choice if you need 1000A current or inrush current capture.
Heavy-duty option
AstroAI CM600 - 1000A Inrush Clamp Meter
Best for users who need AC/DC current up to 1000A, inrush current, temperature, and broader diagnostic coverage for motors, battery banks, EV charging checks, and solar-related work.
- 6000-count display
- True RMS
- AC/DC current up to 1000A
- Inrush current, temperature, NCV, capacitance, frequency, Max/Min, Relative, and Data Hold
- Not best for: users who only need basic AC current checks around the home.
- Pros: stronger range and inrush support for demanding diagnostics.
- Cons: more tool than you need for basic household AC current checks.
Video Walkthrough
Clamp meter video demonstration
Watch the embedded clamp meter video before the step-by-step guide if you prefer to see the tool orientation, jaw placement, and display reading visually.
Video reference: YouTube clamp meter demonstration. Always follow your meter manual and use properly rated equipment for the circuit you are testing.
1. Understand What the Clamp Jaw Measures
The clamp jaw senses the magnetic field around a conductor and converts it into a current reading. That is why a clamp meter can measure current without opening the circuit. It is also why the meter must clamp around one conductor at a time: if equal current flows in opposite directions through live and neutral conductors inside the same cable, the fields cancel and the display can read near zero.
| Measurement | Use the clamp jaw? | Use test leads? | Beginner note |
|---|---|---|---|
| AC current | Yes | No | Clamp one insulated conductor only. |
| DC current | Only on DC-capable clamp meters | No | Use zero/relative if your model requires it. |
| Voltage | No | Yes | Use properly rated leads and avoid live panels unless qualified. |
| Continuity or resistance | No | Yes | Power must be off before resistance or continuity checks. |
2. Clamp Meter Symbols and Functions: Quick Reference
A clamp meter can look intimidating because the dial combines current, voltage, resistance, continuity, NCV, and specialty functions. Use this table as the beginner map before turning the selector.
| Function | What it checks | How to use it |
|---|---|---|
| A~ / AC current | Current draw on AC loads | Clamp around one insulated conductor while the load is running. |
| A⎓ / DC current | Current draw on DC circuits | Use only on DC-capable models such as CM4K0R or CM600. |
| V~ / V⎓ | AC or DC voltage | Use test leads, not the clamp jaw. |
| Ω / continuity | Resistance or closed circuit path | Power off the circuit before testing. |
| NCV | Possible nearby AC voltage | Use as a warning scan only, not proof that power is off. |
| Inrush | Startup surge current | Use on models with inrush support, such as CM600, when checking motors or compressors. |
3. Safety First: Know When Not to Measure
Clamp meters reduce the need to open a circuit for current measurement, but they do not make live electrical work automatically safe. OSHA electrical work-practice rules emphasize de-energizing exposed live parts unless doing so is infeasible or creates additional hazards, and they require qualified-person procedures for energized work. For homeowners and beginners, the practical rule is simple: do not test service panels, exposed conductors, or unknown high-energy circuits unless you are trained and properly equipped.
Beginner safety checklist
- Confirm the meter's CAT rating and voltage rating before the job.
- Inspect leads, probes, jaw, and case before every use.
- Keep fingers behind the guards and away from exposed conductors.
- Use NCV as a warning feature, not as proof that a circuit is safe.
- Stop if the reading, wiring, or environment is unfamiliar.
4. Step-by-Step: How to Measure Current with a Clamp Meter
- Inspect the meter and leads: Check the clamp jaw, case, display, input jacks, and test leads. Do not use damaged leads, cracked cases, loose jaws, or a meter with an unclear safety rating.
- Choose the correct function: Select AC current, DC current, voltage, continuity, resistance, NCV, or inrush mode according to the measurement. Confirm that the selected range is higher than the expected value.
- Clamp around one conductor: For current measurement, open the jaw and clamp around a single insulated conductor. Close the jaw fully and keep the conductor centered when possible.
- Read and stabilize the measurement: Wait for the display to settle. Use Data Hold, Max/Min, or inrush mode when the measurement changes quickly or the display is hard to see.
- Disconnect and store safely: Remove the clamp or leads before changing functions. Turn the meter off, store the leads, and keep the tool away from heat, moisture, and damaged insulation.
5. AC Current vs DC Current: Choose the Correct Model
A basic clamp meter may only measure AC current through the jaw. That is enough for many household appliances, HVAC blowers, and mains-powered loads. DC current requires a DC-capable clamp design, which matters for automotive circuits, battery systems, solar PV, DC motors, and EV-related diagnostics.
| AstroAI clamp model | Current capability | Best fit |
|---|---|---|
| DT202 | AC current up to 400A | Basic AC load checks and entry-level learning. |
| CM2K0R | AC current up to 400A | True RMS and NCV in a compact AC clamp meter. |
| CM4K0R | AC/DC current up to 400A | All-around diagnostics where DC current is useful. |
| CM600 | AC/DC current up to 1000A | High-current, inrush, temperature, PV, EV, motor, and industrial-style checks. |
6. Which AstroAI Clamp Meter Fits Your Scenario?
| Scenario | What matters most | AstroAI fit |
|---|---|---|
| Basic AC appliance checks | AC current, continuity, voltage, simple display | DT202 or CM2K0R |
| Automotive or battery diagnostics | DC current, voltage checks, stable hold functions | CM4K0R for up to 400A DC; CM600 for higher range |
| Motor or compressor startup | Inrush current capture and high current range | CM600 |
| PV, EV, or higher-energy DC checks | AC/DC 1000A current, 1000V DC voltage, qualified safety procedures | CM600, used only by trained users with properly rated equipment |
7. Use Leads for Voltage, Continuity, Resistance, Capacitance, and Frequency
A clamp meter is still a multimeter-style tool. The jaw handles current, but the input jacks and probes handle most other electrical tests. Before using leads, confirm the lead rating, insert them into the correct jacks, select the right function, and never measure resistance or continuity on an energized circuit.
8. What Different Readings Usually Mean
| Reading behavior | Likely cause | What to check next |
|---|---|---|
| 0A or near 0A | Load is off, wrong conductor, or both conductors are inside the jaw | Turn the load on and clamp one conductor only. |
| Negative DC current | Jaw orientation is reversed | Flip the clamp direction or treat the sign as current direction. |
| Unstable reading | Changing load, loose jaw position, or non-steady waveform | Use True RMS, Max/Min, or Data Hold if your model supports it. |
| OL or overload | Range or input limit may be exceeded | Stop and confirm the meter rating and selected function before continuing. |
9. Common Mistakes That Cause Bad Readings
Clamping around the whole cord
Clamp around one conductor only. A full cord often contains current flowing in opposite directions, which can cancel the reading.
Using AC mode on DC current
Automotive and battery circuits are usually DC. Use a DC-capable clamp meter and the correct mode.
Trusting NCV as proof
NCV can warn you about possible voltage, but it is not a final verification of absence of voltage.
Ignoring jaw position
Close the jaw fully and keep the conductor centered when possible for a stable reading.
Final Recommendation
Start with a clamp meter that matches the current you actually need to measure. Choose CM4K0R if you want an all-around AC/DC 400A clamp meter with True RMS, NCV, capacitance, and frequency. Choose CM600 if you need 1000A AC/DC current, inrush current, temperature, and broader high-current diagnostics. Choose DT202 or CM2K0R when your work is mainly basic AC current checks.
Compare AstroAI Clamp Meters →Frequently Asked Questions
What is a clamp meter used for?
A clamp meter is used to measure current by clamping around a single conductor instead of breaking the circuit. Many models also measure voltage, resistance, continuity, capacitance, frequency, temperature, or NCV depending on the model.
Do I clamp around one wire or the whole cable?
Clamp around one conductor only for current measurement. If you clamp around both the live and neutral conductors together, the magnetic fields usually cancel and the meter may read near zero.
Can a clamp meter measure DC current?
Only clamp meters with DC current capability can measure DC current through the jaw. In the AstroAI clamp meter lineup, CM600 supports AC/DC current up to 1000A, while CM4K0R supports AC/DC current up to 400A.
Is NCV enough to prove a circuit is safe?
No. NCV is a useful warning feature, but it should not be treated as proof that a circuit is de-energized. Use properly rated test equipment and follow qualified electrical safety procedures.
What should beginners avoid when using a clamp meter?
Beginners should avoid measuring unknown live circuits, clamping around multiple conductors, using the wrong AC/DC mode, exceeding the CAT rating, or touching exposed conductors. Call a qualified electrician for panel, service, or high-energy work.
Why does my clamp meter show zero amps?
A zero amp reading often means the circuit is off, the load is not drawing current, the clamp is around more than one conductor, or the meter is in the wrong AC/DC mode. Start by confirming the load is running and that the jaw is around one conductor only.
What does True RMS mean on a clamp meter?
True RMS helps a clamp meter read AC current more accurately when the waveform is not a clean sine wave. It is useful around variable-speed motors, LED drivers, dimmers, inverters, and modern electronics.
Sources
- AstroAI - "AstroAI Multimeter & Clamp Meter Comparison 2026," clamp meter model specifications. astroai.com
- OSHA - "1910.333 Selection and use of work practices," electrical safety work-practice context. osha.gov
- YouTube - clamp meter video demonstration used in this guide. youtube.com